

Introduction:
Generally, in certain scenarios, we must terminate a flow if at all some condition was not met. In Power automate we can achieve this by using Terminate Action.
Step 1:
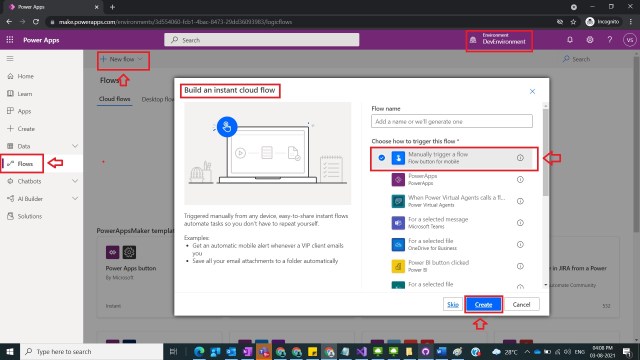
Login to the required Power Apps environment using URL make.powerapps.com by providing username and password and click on Flows on the left-hand side as shown in the below figure.

Step 2:
After Step 1, Click on New Flow and select instant cloud flow and provide the trigger as Manually trigger a flow and click on Create as shown in the below figure.
Step 3:
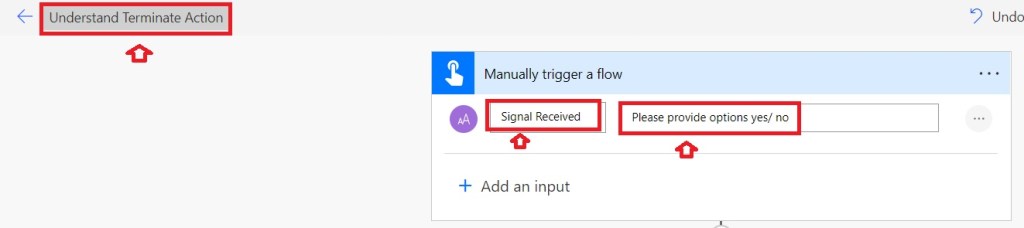
After Step 2 , name the flow as Understand Terminate Action and Manually trigger provide input values of by selecting type of user input as text as
Title : Signal Received
Value : Please provide options yes/ no
as shown in the below figure.
Step 4:
After Step 3 , Take Initialize variable action and provide the values as below
Name : SignalStatus
Type : String
Value : @{triggerBody()[‘text’]} [ From Step 3]
as shown in the below figure.

Step 5:
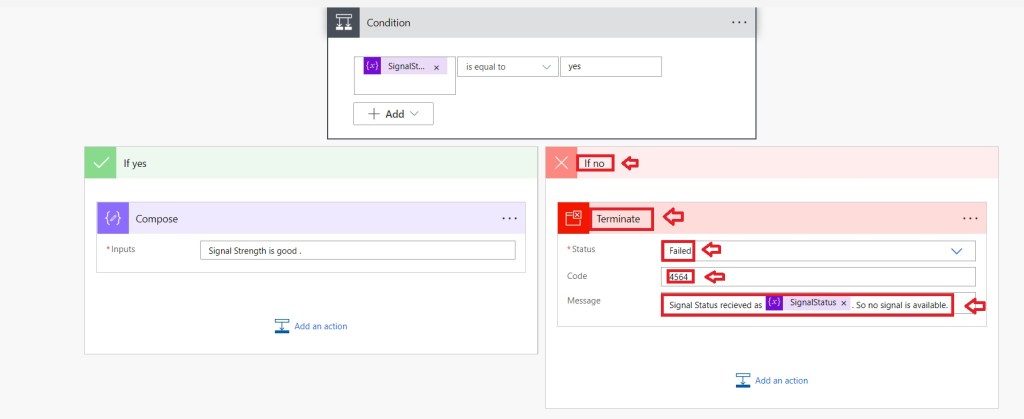
After Step 4, take condition Action and provide the values
Left side as variables(‘SignalStatus’)
Comparison operator: is equal to
Value : yes

Step 6:
After Step 5, under yes part take a compose action and provide the inputs
As
Inputs : Signal Strength is good .
as shown in the below figure.

Step 7:
After Step 6, under no part of the flow take Terminate action and select the following as
Status : Failed
Code : 4564 [ You can provide any number of your choice]
Message : Signal Status recieved as @{variables(‘SignalStatus’)}. So no signal is available.
as shown in the below figure.
Step 8:
After Step 7, now save and test the flow and provide the value as on you should see the see the yes part of the condition action will get executed as shown in the below figure.

Step 9:
After Step 8, now save and test the flow and provide the value as no you should see the see the no part of the condition Terminate action will get executed and terminates flow as shown in the below figure.

Note:
- Terminate action will works as well in loops as well.
- If you are given a choice to stop a flow then consider option of Terminate action over cancel flow run action .
Conclusion: In this way we can easily use Terminate Action in power automate.
Discover more from Common Man Tips for Power Platform, Dynamics CRM,Azure
Subscribe to get the latest posts sent to your email.

Pingback: Rewind April 2022 – Common Man Tips for Power Platform, Dynamics CRM,Azure