


Introduction:
Await / Async is built on promises and is a clean way to represent asynchronous processes in a synchronous way. In Dynamics 365 async and await are used especially while working with web api calls so that until promise gets completed other part of the code will not get executed. As an example, on selected contact record this behaviour was shown .
Step 1:
Login to the required environment and select required solution [Contact Customizations Solution in this case] as shown in the below figure.

Step 2:
After Step 1, select contact web resource in solution and click on Edit as shown in the below figure.

Step 3:
After Step 2, write async keyword before Xrm.WebApi Method and assign the result to a variable with the below code
let result=await Xrm.WebApi.retrieveRecord(“contact”, contactGUID, “?$select=firstname,lastname”);// wait until the promise resolves
As shown in the below figure

Step 4:
After Step 3, include await related code inside a function and decorate that function with async keyword as shown in the below code
async function getdetails(executionContext)
{
let formContext = executionContext.getFormContext();
let contactGUID=Xrm.Page.data.entity.getId().replace(“{“,””).replace(“}”,””);
if (formContext !== null && formContext != ‘undefined’)
{
try {
let result=await Xrm.WebApi.retrieveRecord(“contact”, contactGUID, “?$select=firstname,lastname”);// wait until the promise resolves
console.log(“Async Retrieved values: First Name: ” + result.firstname + “, Last Name: ” + result.lastname);
} catch (error) {
console.error(error);
}
showPopup(executionContext);
}
}
And as shown in the below figure.

Step 5:
After Step 4, implement showPopup function with the below code
function showPopup(executionContext) {
var alertStrings = { confirmButtonLabel: “Ok”, text: “This is an alert.”, title: “Sample title” };
var alertOptions = { height: 120, width: 260 };
Xrm.Navigation.openAlertDialog(alertStrings, alertOptions).then(
function (success) {
console.log(“Alert dialog closed”);
},
function (error) {
console.log(error.message);
}
);
}

Step 6:
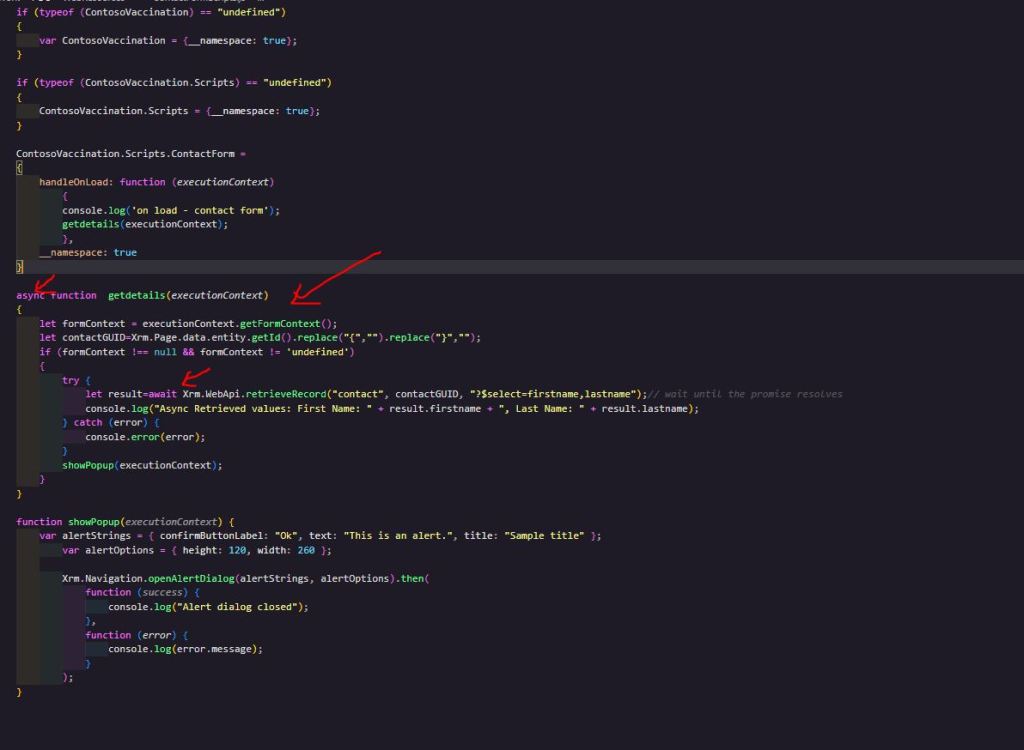
After Step 5, call getdetails function from handleOnLoad function , and the final code looks like below
if (typeof (ContosoVaccination) == “undefined”)
{
var ContosoVaccination = {__namespace: true};
}
if (typeof (ContosoVaccination.Scripts) == “undefined”)
{
ContosoVaccination.Scripts = {__namespace: true};
}
ContosoVaccination.Scripts.ContactForm =
{
handleOnLoad: function (executionContext)
{
console.log(‘on load – contact form’);
getdetails(executionContext);
},
__namespace: true
}
async function getdetails(executionContext)
{
let formContext = executionContext.getFormContext();
let contactGUID=Xrm.Page.data.entity.getId().replace(“{“,””).replace(“}”,””);
if (formContext !== null && formContext != ‘undefined’)
{
try {
let result=await Xrm.WebApi.retrieveRecord(“contact”, contactGUID, “?$select=firstname,lastname”);// wait until the promise resolves
console.log(“Async Retrieved values: First Name: ” + result.firstname + “, Last Name: ” + result.lastname);
} catch (error) {
console.error(error);
}
showPopup(executionContext);
}
}
function showPopup(executionContext) {
var alertStrings = { confirmButtonLabel: “Ok”, text: “This is an alert.”, title: “Sample title” };
var alertOptions = { height: 120, width: 260 };
Xrm.Navigation.openAlertDialog(alertStrings, alertOptions).then(
function (success) {
console.log(“Alert dialog closed”);
},
function (error) {
console.log(error.message);
}
);
}
Step 7:
After Step 6, save script and register it on the contact form on load event and publish it , and open any contact record and observe the result as shown in the below figure

Note:
- Make sure to publish all customizations and upload JavaScript (js) file.
Conclusion: In this way, one can easily make use of asyn and await to represent asynchronous processes in a synchronous way using Webresource(javascript).
Discover more from Common Man Tips for Power Platform, Dynamics CRM,Azure
Subscribe to get the latest posts sent to your email.

Pingback: Back To Basics : Curated List of Articles in a Single Page – Common Man Tips for Power Platform, Dynamics CRM,Azure
Good article venkat.. can u plz do the c# web api integration articles like how to consume apis and how to expose them for other applications and live integrations..
LikeLike