


In Power Pages to create records and store them in dataverse , we can use power of WebAPI and use it inside liquid in web template. I will explain this step by step process with the example of creation of a contact record from a web page.
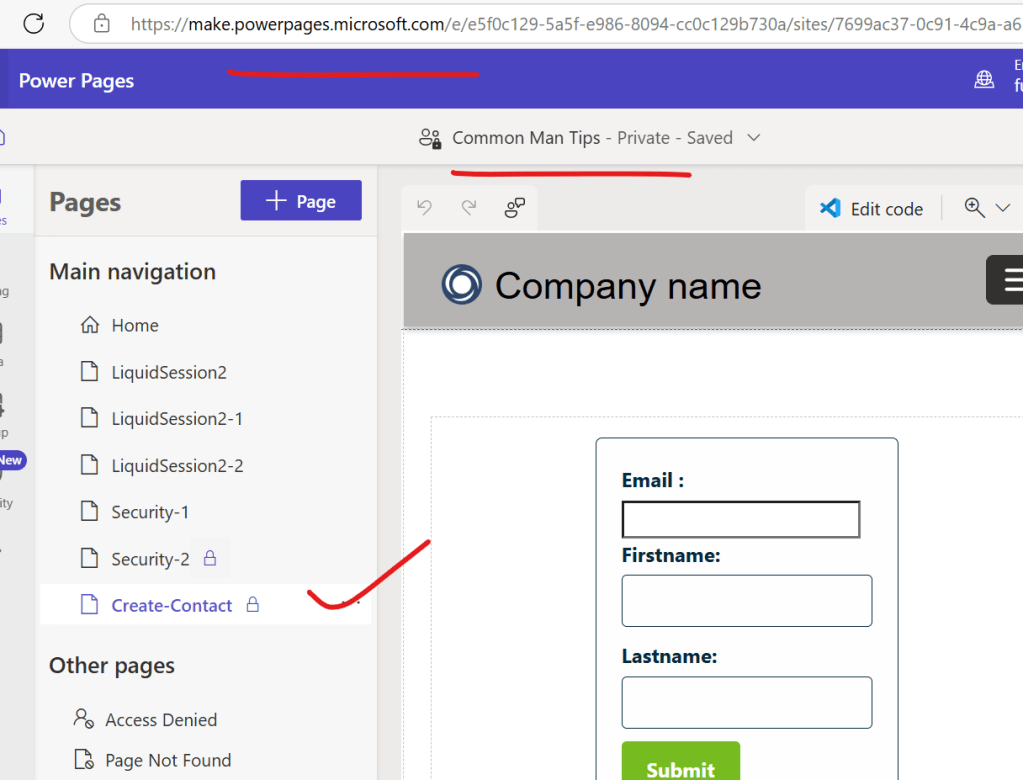
Step 1 : Go to Power Pages Design Studio and then create a new page as shown in below
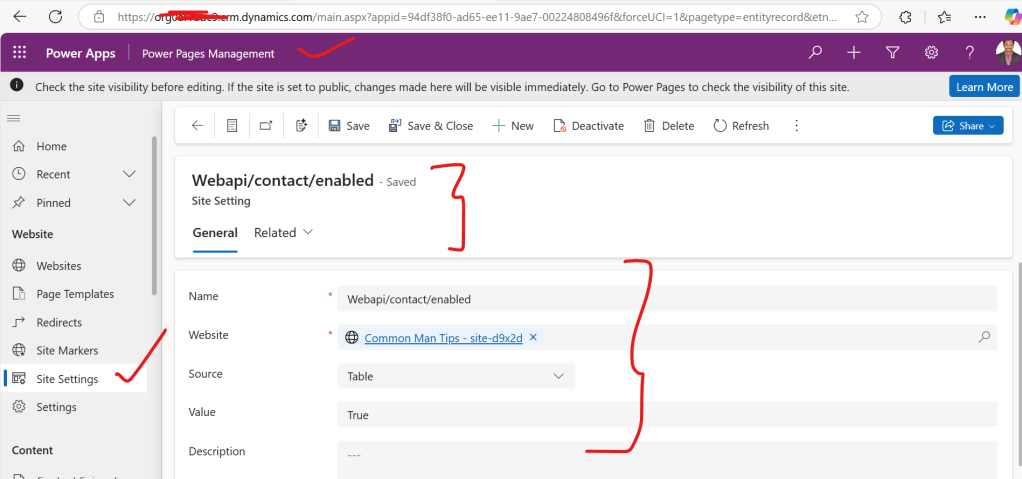
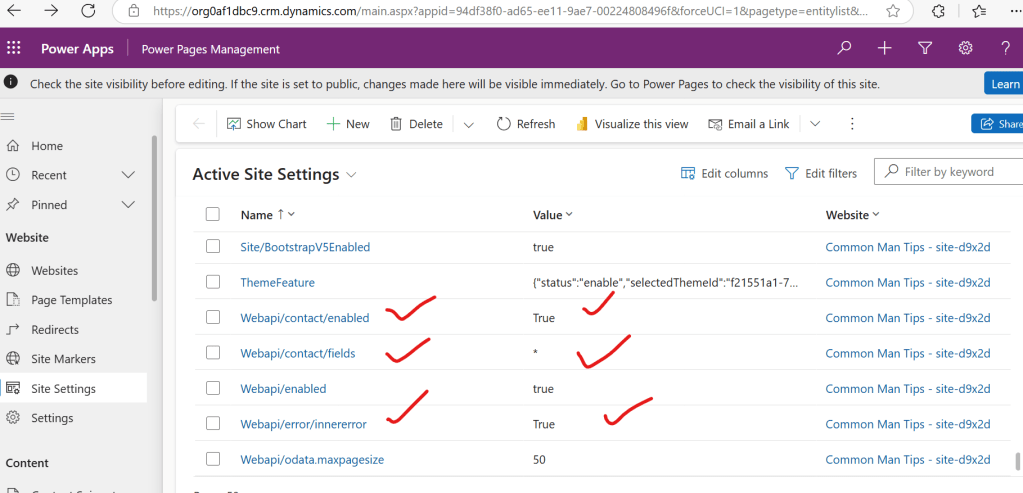
Step 2 : Now we have to create 3 site settings records in Power Pages management under active site settings to enable webapi
a. Create a site setting with the following convention Webapi/<<data verse table name>>/enabled as shown below
b. Create a site setting with the following convention Webapi/<<data verse table name>>/fields here I need all fields that’s why kept * as value, if you need specific fields then logical names of fields of dataverse table can be used separated by a comma as shown below

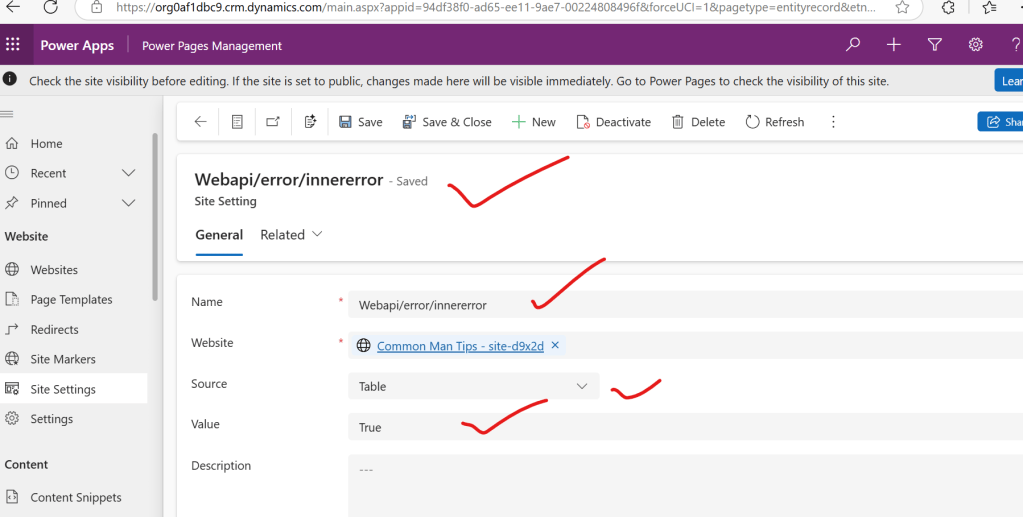
c. In order to enable debugging and trouble shooting for one time for all tables we need to create a site setting with the following details as shown below
So finally we need to create these new 3 site settings as shown below
Step 3 : Now in order to include and generate security token for authentication Microsoft provided code snippet to be used in a webtemplate
code snippet :
<script>
    (function(webapi, $){
            function safeAjax(ajaxOptions) {
                var deferredAjax = $.Deferred();

                shell.getTokenDeferred().done(function (token) {
                    // add headers for AJAX
                    if (!ajaxOptions.headers) {
                        $.extend(ajaxOptions, {
                            headers: {
                                "__RequestVerificationToken": token
                            }
                        });
                    } else {
                        ajaxOptions.headers["__RequestVerificationToken"] = token;
                    }
                    $.ajax(ajaxOptions)
                        .done(function(data, textStatus, jqXHR) {
                            validateLoginSession(data, textStatus, jqXHR, deferredAjax.resolve);
                        }).fail(deferredAjax.reject); //AJAX
                }).fail(function () {
                    deferredAjax.rejectWith(this, arguments); // on token failure pass the token AJAX and args
                });

                return deferredAjax.promise();
            }
            webapi.safeAjax = safeAjax;
        })(window.webapi = window.webapi || {}, jQuery)
    </script>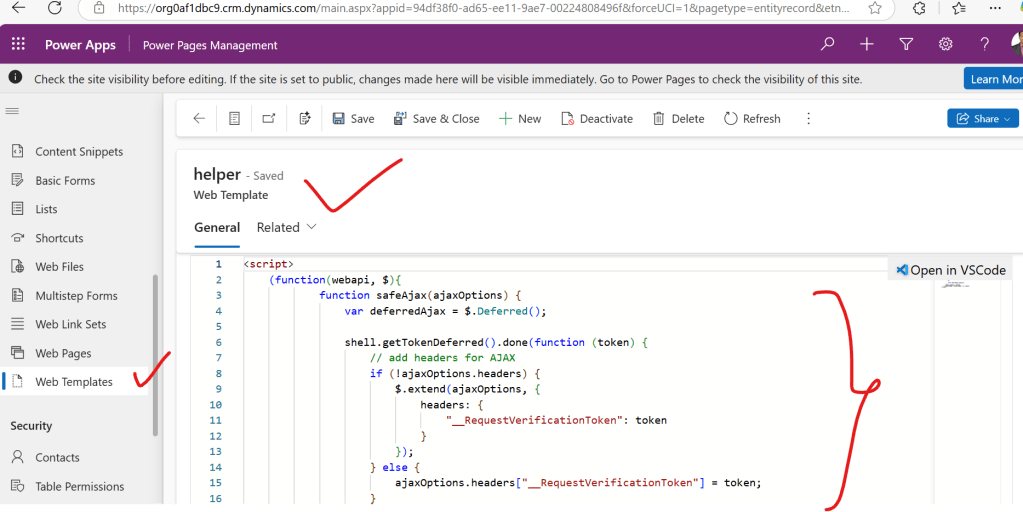
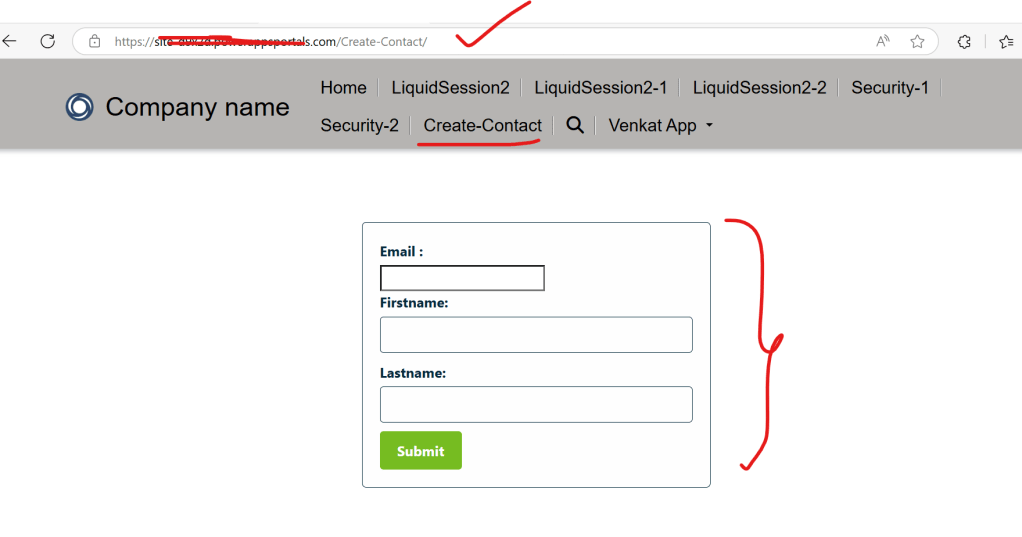
Step 4 : Now go to webpage Create contact and then add this helper webtemplate inside that web page and then design html and css for contact creation ui , in this example with email,firstname,last name and submit button as shown below code
<style>
  /* Adjust the styles as needed */

  form {
    max-width: 400px;
    margin: 0 auto;
    padding: 20px;
    border: 1px solid #042B3C;
    border-radius: 5px;
    background-color: #FEFEFE;
  }

  label {
    display: block;
    margin-bottom: 5px;
    font-weight: bold;
    color: #042B3C;
  }

  input[type="text"],
  textarea,
  input[type="datetime-local"],
  input[type="number"] {
    width: 100%;
    padding: 8px;
    border: 1px solid #042B3C;
    border-radius: 4px;
    box-sizing: border-box;
    margin-bottom: 10px;
    background-color: #FEFEFE;
    color: #042B3C;
  }

  input[type="submit"] {
    background-color: #76BC21;
    color: #FEFEFE;
    padding: 10px 20px;
    border: none;
    border-radius: 4px;
    cursor: pointer;
    font-weight: bold;
  }

  input[type="submit"]:hover {
    background-color: #FF4712;
  }
</style>

<div class="row sectionBlockLayout text-start" style="min-height: auto; padding: 8px;">
    <div class="container" style="display: flex; flex-wrap: wrap;">
      <div class="col-lg-12 columnBlockLayout" style="padding: 16px; margin: 60px 0px; min-height: 200px;">

        {% include 'helper' %}
        <form id="myForm">
          <label for="email">Email :</label>
          <input type="email" id="email" name="email" required><br>

          <label for="firstname">Firstname:</label>
          <input type="text" id="firstname" name="firstname" required><br>

          <label for="lastname">Lastname:</label>
          <input type="text" id="lastname" name="lastname" required><br>


          <input type="submit" value="Submit">
        </form>
      </div>
    </div>
  </div>
  <script>

    $(document).ready(function() {
        $('#myForm').submit(function(event) {


            event.preventDefault(); // Prevent the default form submission

            // Create a new record object from form data
            var record = {};
            record.emailaddress1 = $('#email').val(); // Text
            record.firstname = $('#firstname').val(); // Multiline Text
            record.lastname = $('#lastname').val(); // Date Time


            // Call the WebAPI helper function to create the record
            webapi.safeAjax({
                type: "POST",
                contentType: "application/json",
                url: "/_api/contacts",
                data: JSON.stringify(record),
                success: function (data, textStatus, xhr) {
                    var newId = xhr.getResponseHeader("entityid");
                    console.log(newId);
                    // Reset the form after successful submission
                    $('#myForm')[0].reset();
                    just_added(newId);
                },
                error: function (xhr, textStatus, errorThrown) {
                    console.log(xhr);
                }
            });
        });

        //Read example
        function just_added(id) {

            webapi.safeAjax({
                type: "GET",
                url: "/_api/contacts("+id+")?$select=firstname",
                contentType: "application/json",
                headers: {
                    "Prefer": "odata.include-annotations=*"
                },
                success: function (data, textStatus, xhr) {
                    var result = data;
                    console.log(result);
                    // Columns
                    var id = result["contactid"]; // Guid
                    var firstname = result["firstname"]; // Text
                    alert("You just added a contact called: " + firstname);
                },
                error: function (xhr, textStatus, errorThrown) {
                    console.log(xhr);
                }
            });

        }

    });

    </script>
As shown in the below figure

Step 5: Now save webpage and then click on sync so that we can see the webpage like below
Step 6 : Now enter details and then click on submit you should see records gets created in dataverse in contact table , we can verify in advance find option present in classic interface of dynamics crm
Note :
1.If helper webtemplate mentioned in step 3 is not mentioned properly in step 4 then we get authentication error
2.In the code to create dataverse record with webapi, we can use ready made code that is available by using dataverse restbuilder add on that was Created by Guido Preite as shown below
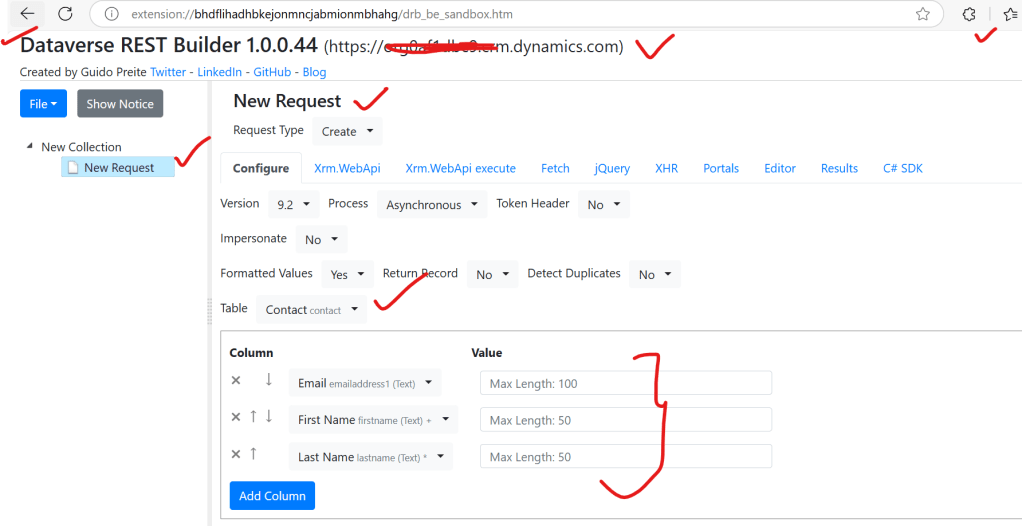
After configuring , you can navigate to portals tab and click on execute code and replace text fields and use it in our webpage as shown below

Discover more from Common Man Tips for Power Platform, Dynamics CRM,Azure
Subscribe to get the latest posts sent to your email.
