

Introduction:
Most of the common usage of storing data in Excel Spread sheets and a common scenario was to add data into Spread Sheet. We can use an action Add A row into a Table in Power Automate under connector Excel Online (Business). As an example, Employee details will be passed to Spread sheet through Power Automate.
Step 1:
Login to the required Power Apps environment using URL make.powerapps.com by providing username and password and click on Flows on the left-hand side as shown in the below figure.

Step 2:
After Step 1, Click on New Flow and select instant cloud flow and provide the trigger as Manually trigger a flow and click on Create as shown in the below figure.

Step 3:
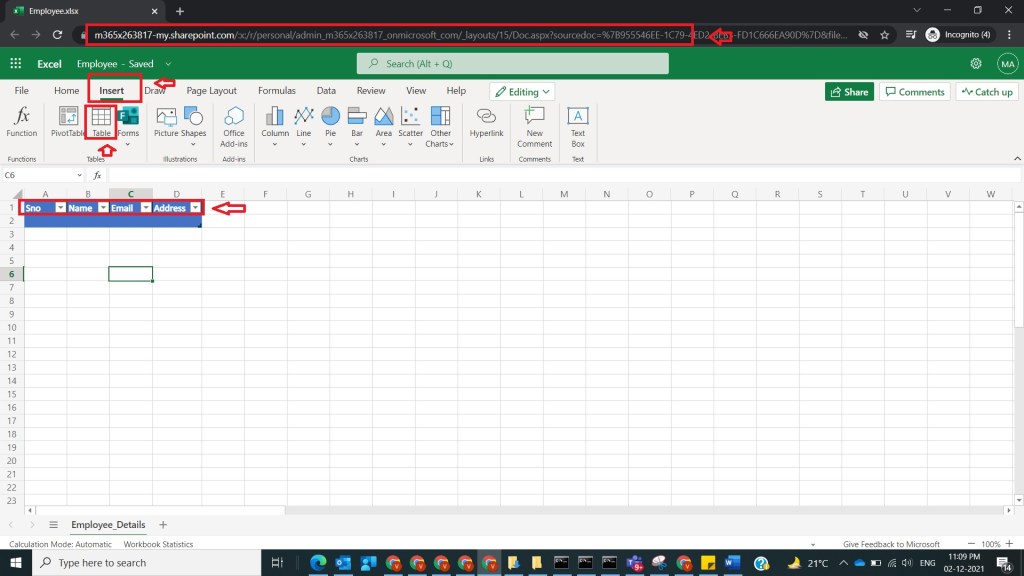
After Step 2, open OneDrive and create spread sheet with name Employee and name sheet name as Employee_Details and then provide column names as Sno,Name,Email,Address and then under insert tab click on table and observe all the columns will get a filter beside them which infers a table was constructed and then click on save as shown in the below figure.
Step 4:
After Step 3, go back to the flow and then name it as Add A row into a Excel Table Onedrive and then select Excel Online (Business) connector and establish required connection as shown in the below figure.

Step 5:
After Step 4, under Excel Online (Business) select Action Add a row into a Table as shown in the below figure.

Step 6:
After Step 5, under Manual trigger a flow provide inputs as per columns that are provided in Spread sheet as shown in the below figure.

Step 7:
After Step 6, go back to add a row into a table and provide the following values as
Location : OneDrive for Business
Document Library: One Drive
File : ExcelWorkBooks/Employee.xlsx
Table : Table1
Sno : Sno [From Manually Trigger a Flow Step]
Name : Name[From Manually Trigger a Flow Step]
Email : Email[From Manually Trigger a Flow Step]
Address: Address[From Manually Trigger a Flow Step]
And then click on save as shown in the below figure.

Step 8:
After Step 7, Test and run the flow by providing the inputs and click on run flow as shown in the below figure

Step 9:
After Step 8, now navigate back to the excel sheet and observe employee data with the above details populated post flow runs successfully as shown in the below figure

Note:
- Make sure during Excel Online (Business) Connection establishment a popup window will be shown and if asked provide details and wait till that authentication popup window automatically gets closed.
- In the spread sheet, make sure you go into insert tab and then select table then only Table will be available in flow to select, here in our case Table1 was shown only after following mentioned process.
- As an example one drive was considered , but other options of Excel spread sheets like SharePoint etc also can be worked out.
Conclusion: In this way we can add a row into an Excel Table in power automate easily.
Discover more from Common Man Tips for Power Platform, Dynamics CRM,Azure
Subscribe to get the latest posts sent to your email.

Pingback: Rewind December 2021 – Common Man Tips for Power Platform, Dynamics CRM,Azure
Thanks for your great article.
can we do it same with xls files rather xlsx please. i am facing issues while adding rows in table in xls file.
Please suggest.
LikeLike
It should be possible as per process, but has not tried that as either csv or xlsx was widely used. try csv instead of xls file
LikeLike