

Introduction:
During certain scenarios we must quickly test Dynamics CRM Web API Requests. We Can leverage Postman Tool to achieve. As an example, here we are going to explore how to create an Environment in Post Man Tool.
Step 1:
Open Postman Tool, click on Environments and then Click on + button and name it as Dynamics CRM as shown in the below figure.

Step 2:
After Step 1, we need Dynamics CRM web api url, so for that we have to open existing CRM Environment and navigate to Settings-> Customizations -> Developer Resources , copy Uri part of Dynamics CRM Environment from Service Root URL and remove from /api as shown in the below figure.

Step 3:
After Step 2, now navigate to Postman tool environment and add Variables like below
VARIABLE: url
For Initial Value provide the api value that we extracted from Step 2
INITIAL VALUE: https://orgfea8bbba.api.crm.dynamics.com
as shown in the below figure.

Step 4:
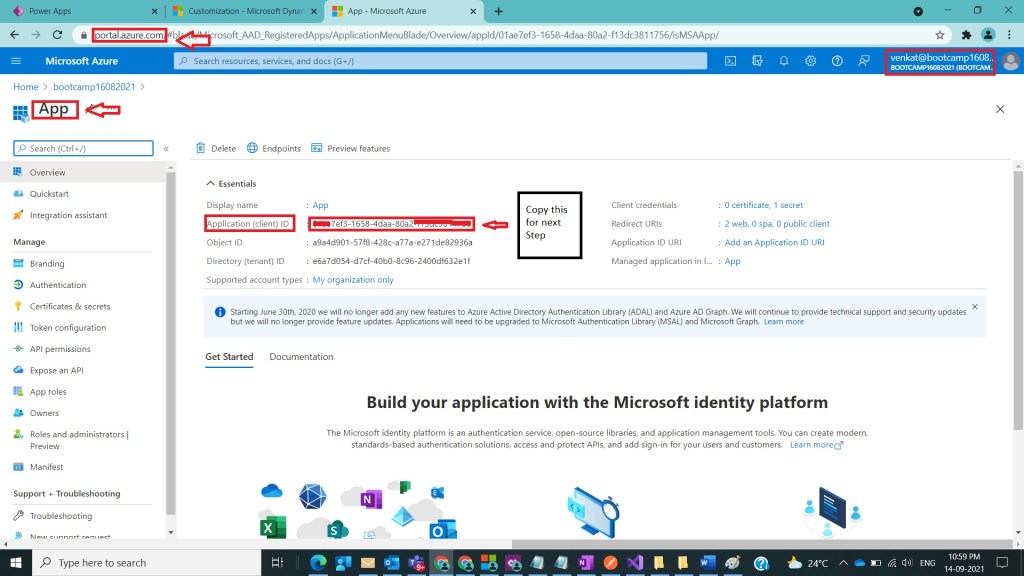
After Step 3, we must navigate to Azure portal through portal.azure.com using Dynamics CRM Environment and open Azure Active Directory then Applications , select created application and copy application /client id for the app which we registered in previous post as shown in the below figure.
Step 5:
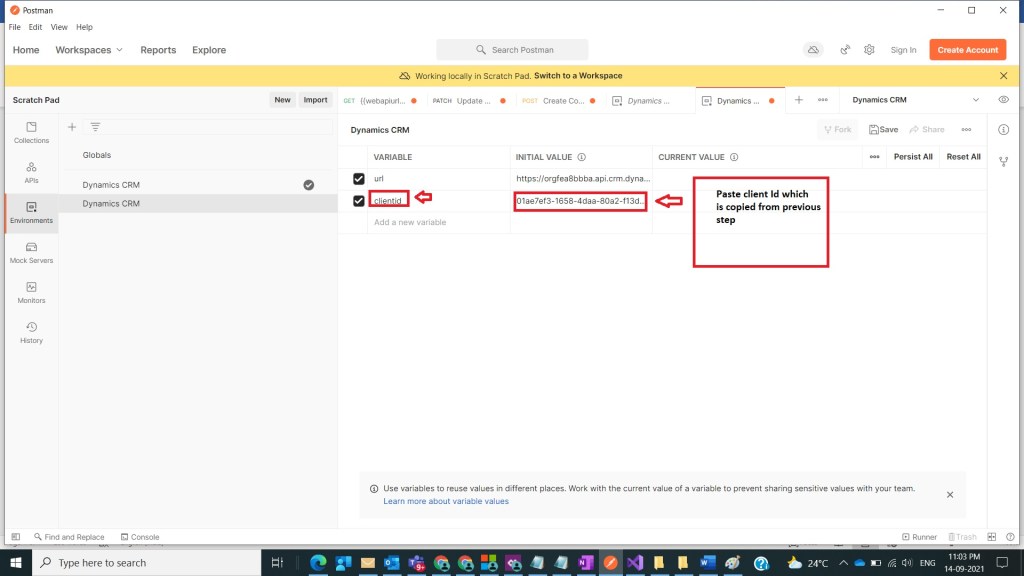
After Step 4, now navigate to Postman tool environment and add Variables like below
VARIABLE: clientid
For Initial Value provide the api value that we extracted from Step 4
INITIAL VALUE: 01ae7ef3-1658-4daa-80a2-f13dc1234567
as shown in the below figure.
Step 6:
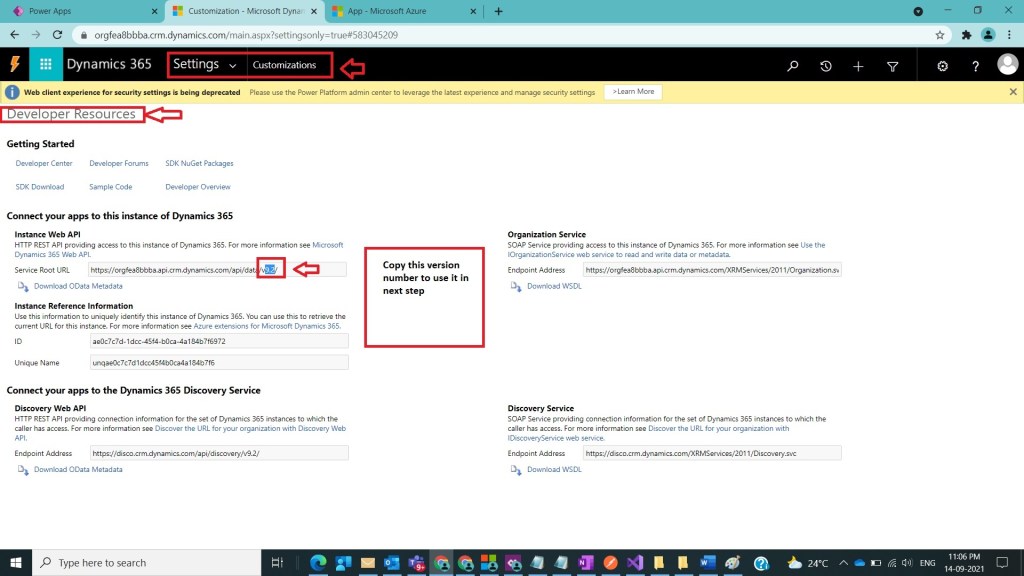
After Step 5, we need Dynamics CRM web api url, so for that we have to open existing CRM Environment and navigate to Settings-> Customizations -> Developer Resources, copy version number of Dynamics CRM Environment from Service Root URL and as shown in the below figure.
Step 7:
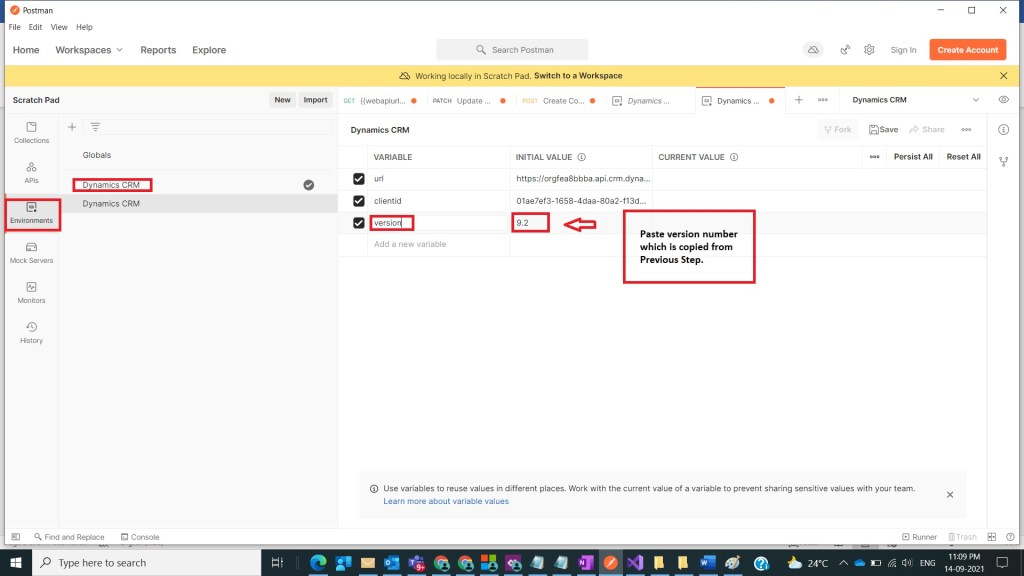
After Step 6, now navigate to Postman tool environment and add Variables like below
VARIABLE: version
For Initial Value provide the api value that we extracted from Step 5
INITIAL VALUE: 9.2
as shown in the below figure.
Step 8:
After Step 7, now navigate to Postman tool environment and add Variables like below
VARIABLE: webapiurl
INITIAL VALUE: {{url}}/api/data/v{{version}}/
as shown in the below figure.

Step 9:
After Step 8, now navigate to Postman tool environment and add Variables like below
VARIABLE: callback
INITIAL VALUE: https://callbackurl
as shown in the below figure.

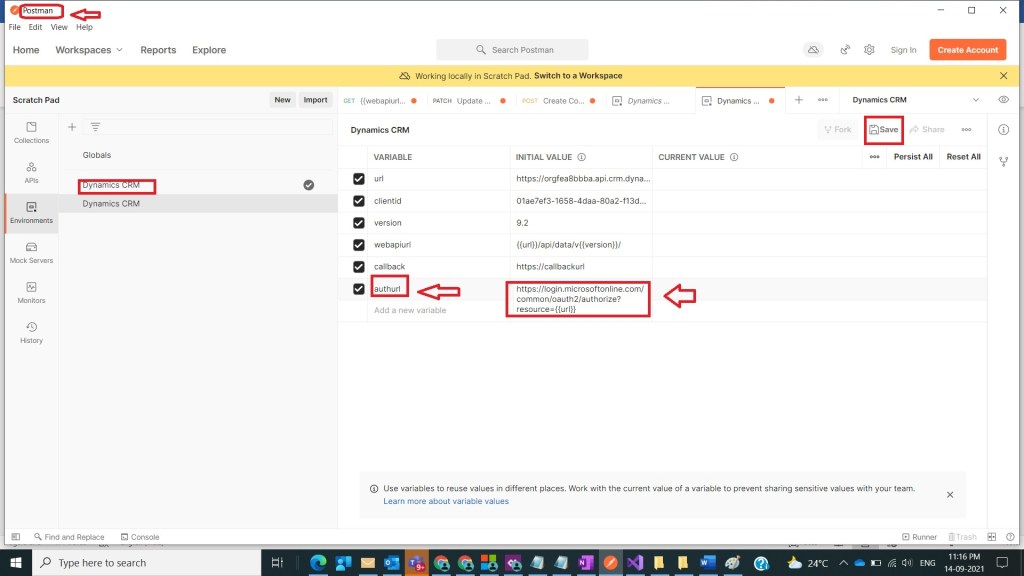
Step 10:
After Step 9, now navigate to Postman tool environment and add Variables like below
VARIABLE: authurl
INITIAL VALUE: https://login.microsoftonline.com/common/oauth2/authorize?resource={{url}}
And then click on save button as shown in the below figure.
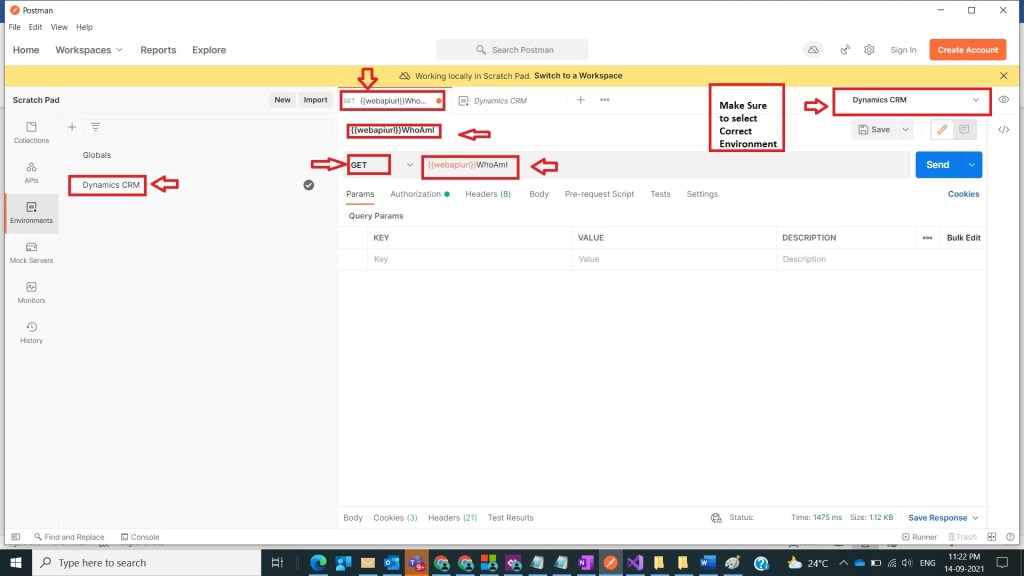
Step 11:
After Step 10, we must test the created environment by considering a Get Request and select Environment as Dynamics CRM and provide uri as
{{webapiurl}}WhoAmI
as shown in the below figure.
Step 12:
After Step 11, select Authorization Tab and Select Type as OAuth2.0 and Add authorization data to Request Headers and click on Get New Access Token
as shown in the below figure.

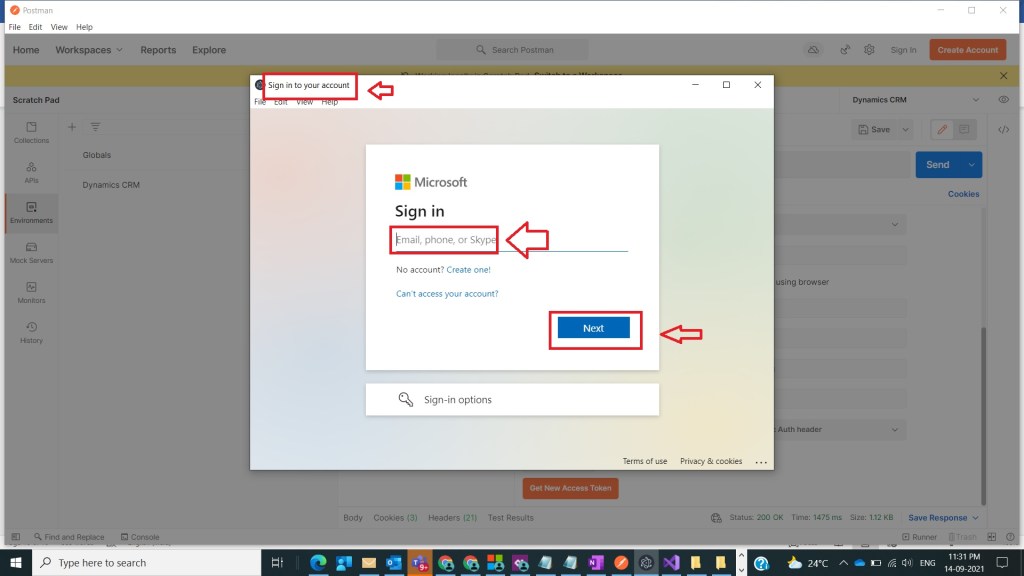
Step 13:
After Step 12, a new window gets popups and provide crm user name and password for the first time when we are connecting through environment
as shown in the below figure.
Step 14:
After Step 13, if everything works fine as configured then one should see manage tokens window click on Use Token
as shown in the below figure.

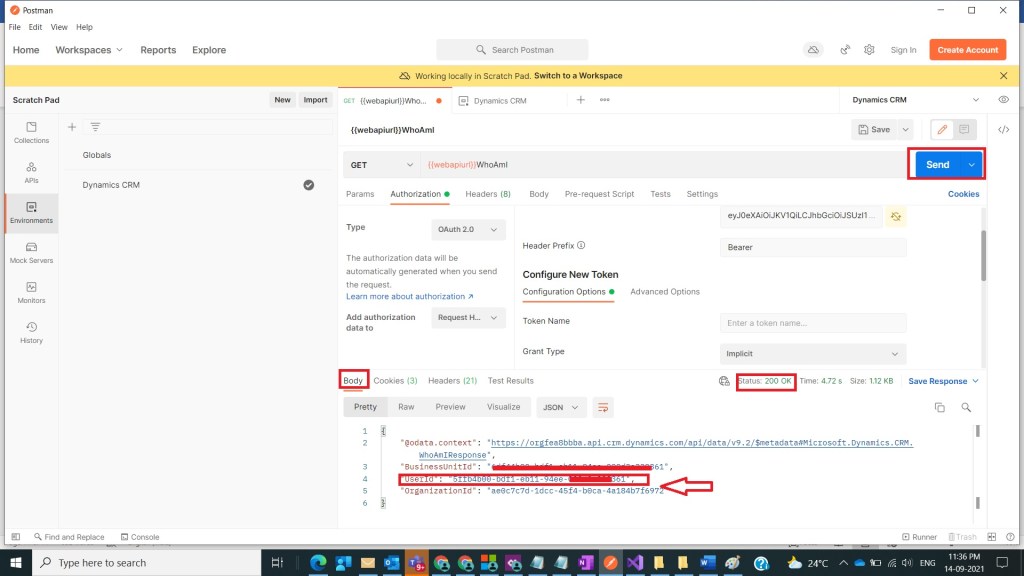
Step 15:
After Step 14, now click on Send request and observe Body section with user id details of the logged in CRM User and the status as 200
as shown in the below figure.
Note:
- Download Postman tool from here [In this example used Desktop Postman tool]
- Dynamics 365 online trial instance here
- Azure Active Directory Admin Center here
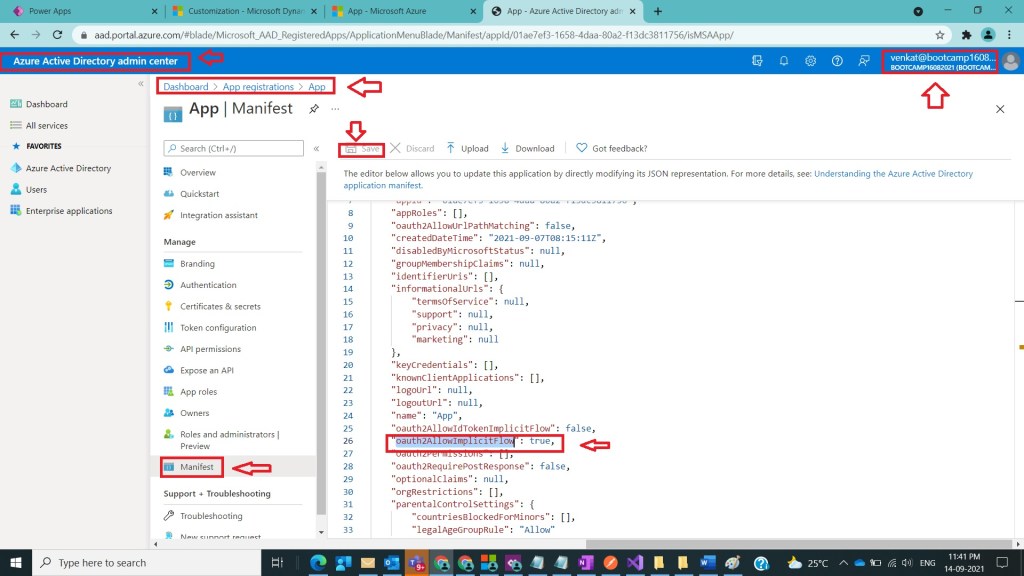
- In case if 401 un authorized error occurs, then open app in Azure portal and navigate to Manifest and provide oauth2AllowImplicitFlow as true as shown in the below figure.
- In Case if invalid token error occurs during login as specified in Step 13, then go to Post Man Tool Environment and copy call back url value https://callbackurl and then open Azure Active Directory and select created App and under App, go to Authentication tab and under Redirect URI’s add a new entry with value https://callbackurl and save it as shown in the below figure.

Conclusion: In this way, one can easily test Dynamics CRM Web API Requests using Postman Tool Environment.
Discover more from Common Man Tips for Power Platform, Dynamics CRM,Azure
Subscribe to get the latest posts sent to your email.

Pingback: Rewind September 2021 – Common Man Tips for Power Platform, Dynamics CRM,Azure
Pingback: Back To Basics # : Curated List of Articles in a Single Page – Common Man Tips for Power Platform, Dynamics CRM,Azure